Tag: AppVolumes

  • Behind the Scenes of an App Launch

    Behind the Scenes of an App Launch

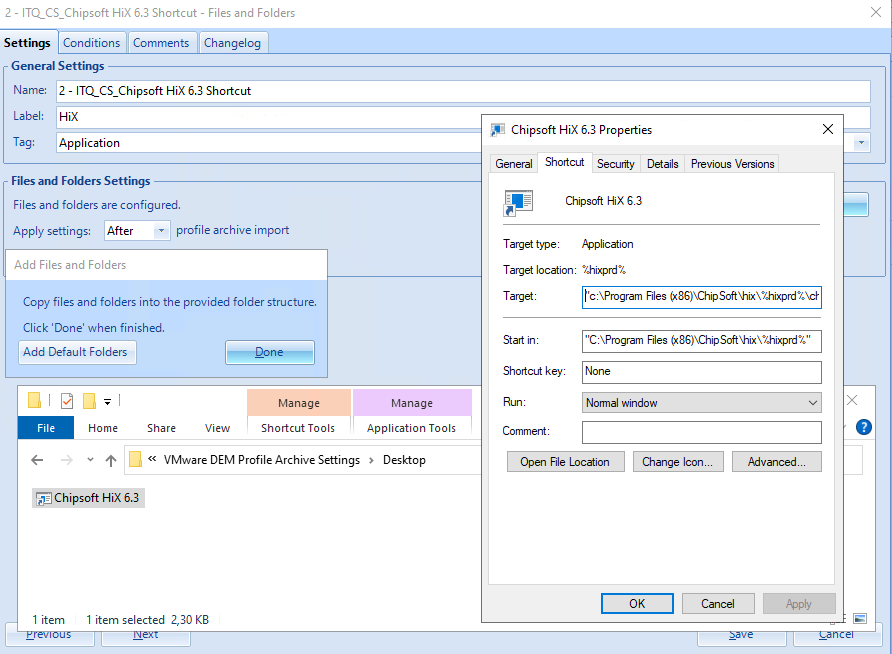
    In our daily practice with Omnissa AppVolumes and DEM, you sometimes run into unexpected challenges. This week I encountered one myself with an application that relies on shortcuts containing specific parameters.

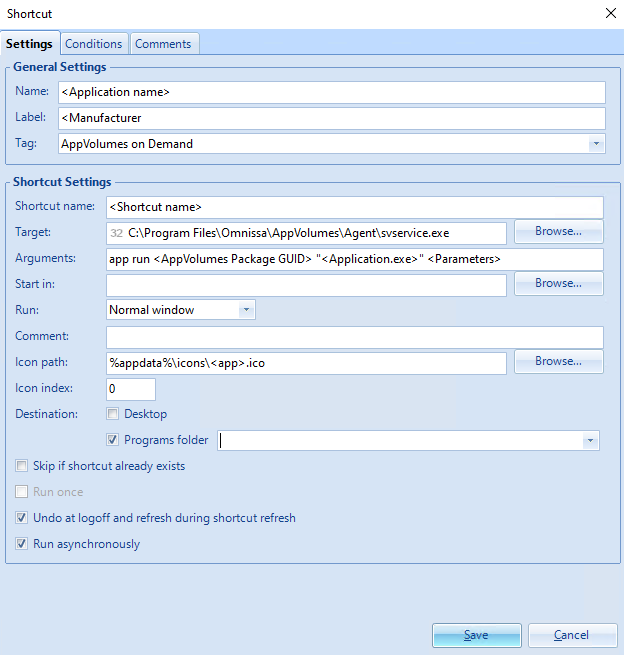
    Since the application only needs to be available to a relatively small group of employees, we decided to deliver it through an AppVolumes On Demand package. The shortcut itself was created in DEM, pointing to svservice.exe with the required app run parameters. Time to test…


    The Problem

    When launching the shortcut, the familiar AppVolumes notifications appeared, but then nothing happened: the application simply didn’t start. After checking, the AppVolumes package was indeed attached. So the next step was to look at the logs.
    In “C:\Program Files\Omnissa\AppVolumes\Agent\Logs\svservice.log” everything initially looked fine, the shortcut was reported as successfully started.

    On closer inspection, however, it turned out that not all parameters were passed along. And that was the crux: the application wasn’t receiving the full command line it needed to run.

    The complete command ended up being 282 characters long, exceeding the standard Windows limit. It was the combination of the AppVolumes On Demand option with the lengthy parameters that pushed it past this boundary, making a traditional shortcut insufficient.

    Workaround

    I am aware that there are other options available, such as modifying the MAX_PATH registry settings to allow longer arguments.

    [HKLM\Machine\System\CurrentControlSet\Control\FileSystem]
    "LongPathsEnabled"=dword:00000001 

    However, in this situation we deliberately chose not to go down that path.

    To work around this, I created a PowerShell script from which the application is launched.

    # Path to svservice.exe and arguments
    $svServicePath = "C:\Program Files\Omnissa\AppVolumes\Agent\svservice.exe"
    $appArguments  = 'app run <AppVolumes Package GUID> "<Application.exe>" <Parameters>'
    
    # Launch svservice.exe and wait until it completes
    Start-Process -FilePath $svServicePath -ArgumentList $appArguments -NoNewWindow -Wait

    And created a DEM shortcut that directly points to the PowerShell script.

    Functionally this worked well, but there was one drawback: when executing the script, a PowerShell console window briefly appeared. Even though it was only visible for a moment, I didn’t consider this desirable for the end user.


    From Script to .exe with PS2EXE

    That’s when I took it a step further. With PS2EXE, you can convert a PowerShell script into an executable file (.exe), see the PS2EXE project on GitHub for more information: https://github.com/MScholtes/PS2EXE. The advantage is that the script is “packaged” as a program, so no PowerShell window appears when it runs. For the end user, it feels just like starting a regular application.

    The script itself was fairly simple:

    Invoke-PS2EXE -InputFile "<Path to Script.ps1>" -OutputFile "<Path to Exe.exe>" -NoConsole -NoOutput
    

    By converting this script into an .exe with ps2exe, I can call it directly from DEM without the PowerShell window flashing up. The result: the application starts as intended, the parameters are correctly applied, and the end user notices no difference.


    Conclusion

    It may not be the most elegant solution, but it’s a pragmatic approach that removes friction for the end user. Sometimes these kinds of workarounds are exactly what’s needed to keep the environment stable and user-friendly. And it highlights how useful tools like ps2exe can be for eliminating small annoyances and improving the overall experience.

  • AppVolumes Package Report

    AppVolumes Package Report

    We regularly receive questions from customers seeking clarity about the contents of their AppVolumes packages. A common question is: What exactly is inside my package, and how can I view it?

    For experienced administrators, techniques like disabling the filter driver or analyzing the “AppDB.txt” file are familiar and easy to execute. But that’s not always the case for everyone.

    New in Version 2509

    With version 2509, AppVolumes introduced a valuable enhancement. When creating a package, the system now automatically generates additional JSON and HTML files that provide a clear overview of:

    • Folders and files
    • Registry keys and values
    • The overall structure of the package

    This makes troubleshooting much easier for many users and also helps you clean up your packages more effectively.

    Creating a Package

    Here’s the command I used to create a package for Notepad++:

    cd "C:\Program Files\Omnissa\AppVolumes\Agent\"
    appcapture.exe start /name NotepadPP /format vmdk /upgradecode {8e14035b-2fcc-49c6-814d-7ae010c445b8}

    Once the capture process has started, you can proceed to install the application as you normally would. In this case, I downloaded and installed Notepad++, making sure to complete the installation fully, including any optional components or settings relevant to the package.

    Of course, these installation steps are automated using deployment tools or scripts, ensuring consistency and saving time during packaging.

    After the installation is complete and the application is ready to use, you finalize the capture process with:

    cd "C:\Program Files\Omnissa\AppVolumes\Agent\"
    appcapture.exe finalize

    In the default output folder (C:\ProgramData\Omnissa\AppVolumes\Packages\), you’ll now find the following files:

    • NotepadPP.vmdk — the virtual disk containing the application
    • NotepadPP.json — metadata about the package
    • NotepadPP.report.html — a visual report of the package contents
    • NotepadPP.report.json — a structured report for automated analysis

    These new report files provide detailed insights into the folders, files, registry keys, and values included in the package, making troubleshooting and cleanup much easier.


    The Report Files

    You can open the .report.html file in any browser to get a clear, scrollable view of the package contents. Below is an example of how the html is displayed:

    The layout is clean and categorized, making it easy to spot unnecessary entries or validate that all required components are included.

    The .report.json file is ideal for scripting or integrating with other tools. You can parse it to:

    • Compare packages
    • Detect changes between versions
    • Generate cleanup scripts

    This structured format opens the door to smarter package management and auditing.

    Analyzing Existing Packages

    Want to analyze an existing package? You can use the following command:

    appcapture.exe packagereport /file "C:\Path\To\Your\Package.vmdk"

    This generates both the HTML and JSON report files into the package’s contents.


    It’s great to see a powerful product like AppVolumes continue to evolve and become even more user-friendly for both administrators and end users.

    For more information on release notes and command-line parameters, check out:

  • The shortcut that broke the flow

    The shortcut that broke the flow

    At one of our hospital clients, we deployed a new digital workspace built on Omnissa products like Horizon, App Volumes, and DEM. Ivanti Automation Manager was already in use. The EHR system receives multiple updates each month, including hotfixes. Previously, every update required a new image, a time-consuming and error-prone process.

    With App Volumes as our Application Layering solution, we gained flexibility. And we went a step further: we fully automated the packaging process.

    What we automated

    Using PowerShell scripts and an Ivanti Automation Runbook, we automated:

    • Creation of Ivanti Automation resources and modules
    • Creation of App Volumes Applications and Packages
    • Booting the Package VM
    • Installing the application into the App Volumes package
    • Reverting the Package VM to snapshot
    • Marking the package as ‘Current’
    • Assigning the package to users

    The only manual steps left are entering the HF number and providing the necessary credentials to execute tasks and link them to logging. Everything else runs automatically.

    Smart versioning with DEM integration

    To stay flexible, we place each application in a folder named after its version. This allows multiple versions to coexist across Test, Acceptance, and Production environments. The correct version is launched via a DEM shortcut using a variable:

    C:\Program Files (x86)\Chipsoft\Hix\%HiXPrd%\Chipsoft.hix.exe
    C:\Program Files (x86)\Chipsoft\Hix\%HiXAcc%\Chipsoft.hix.exe
    C:\Program Files (x86)\Chipsoft\Hix\%HiXTst%\Chipsoft.hix.exe

    In DEM, it’s easy to see which environment runs which version. Updating the variable is the only manual step, intentionally kept that way.

    And then it broke…

    Everything worked as expected. Until after an update, the service desk started receiving calls: the shortcut no longer worked.

    Turns out some users had dragged the shortcut from the desktop to the taskbar. DEM translates variables into static paths. Once copied, the shortcut becomes fixed to a specific version. After an update, that path is no longer valid resulting in errors, frustration, and no access to the EHR.

    The fix: Files and Folders

    We solved this by no longer using DEM shortcuts. Instead, we use a Files and Folders action to place a file with the correct reference on the desktop and in the start menu. This preserves the variable and ensures the shortcut keeps working after updates.

    Conclusion

    Technical automation is incredibly valuable. It saves time and boosts reliability. But in the end, it’s all about the end-user experience. For them, it just has to work. That’s where the real value lies.

    I’m curious to hear if others have found a more elegant solution to this. Have you tackled similar shortcut issues in a smarter way? I’d love to learn from your approach.