A few weeks after upgrading App Volumes, an upgrade that hadn’t gone entirely smoothly, we started receiving reports from end users. They noticed that certain applications were suddenly taking much longer to launch. It quickly became clear that the issue was specifically related to App Volumes On Demand applications. What normally opened within seconds now took more than two minutes. The applications did eventually start, but the delay was unacceptable.
At first, the svservice.log didn’t reveal anything unusual, aside from a few CPU‑related messages. The applications still launched, so nothing pointed directly to the root cause. Even older versions of the master image, including those with the previous agent, showed the same behavior. Disabling the DEM layer didn’t help, nor did excluding GPOs.
Next, I turned my attention to the App Volumes Managers, but again, nothing suspicious appeared in the logs.
To rule out other possibilities, I tested the same packages on our PackageVM, the machine we use to build and validate App Volumes packages. Interestingly, I couldn’t reproduce the issue there. With the same configuration and software stack as our VDI environment, everything worked flawlessly. It became clear that the App Volumes Manager or upgrade wasn’t part of the problem.
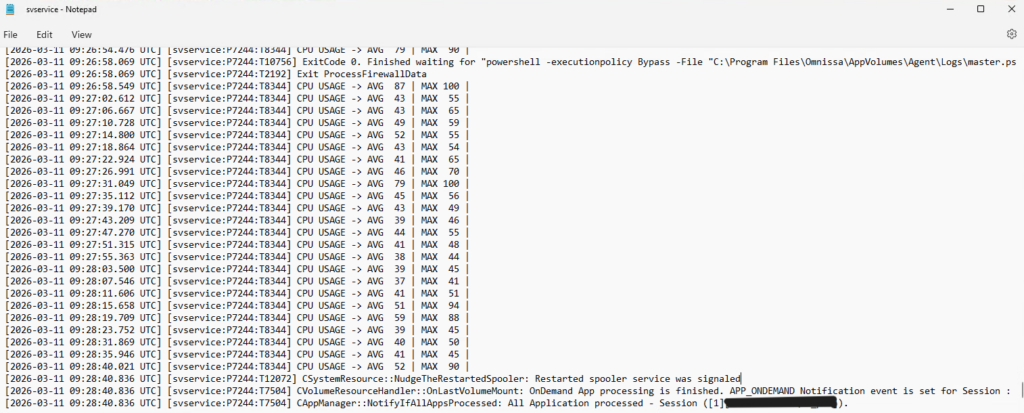
So I went back to the svservice.log and examined it line by line. That’s when a specific entry caught my attention, one that pointed toward the Print Spooler.

Restarting the Print Spooler service took just over two minutes, exactly matching the delay users were experiencing. That was the breakthrough. As a test, I applied the App Volumes registry key that prevents the Print Spooler from restarting when loading packages. Immediately, application launches returned to normal speeds.
HKLM\SYSTEM\CurrentControlSet\Services\svservice\Parameters\
DisableSpoolerRestart
Type: REG_DWORD
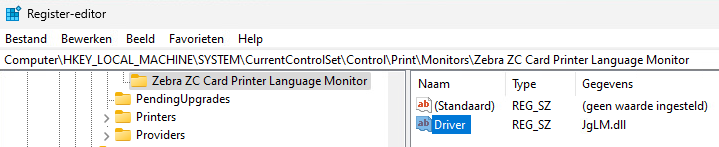
Value: 1Of course, leaving that registry key in place wasn’t a long term solution. We needed to understand why the Print Spooler was causing delays. Special thanks to Gunther Leeman for digging deeper. He discovered that a print driver monitor was responsible for the slowdown. Removing the related registry keys instantly resolved the issue. Further investigation showed that this component wasn’t required for printing functionality at all, so we want to removed it from the master image.
That was the moment the last piece of the puzzle fell into place!
We discovered that the problematic print driver wasn’t actually part of the master image. It was being installed on specific workstations during startup through a targeted action. That explained why the issue didn’t appear on the PackageVM, yet still occurred on earlier master images.
We’ve now resolved the problem by including the print driver directly in the master image, but without the unnecessary print driver monitor.
This issue was a reminder that even the smallest, most unexpected component can cause major disruptions. Sometimes it’s not the big changes or complex systems that trip you up, but a tiny detail hiding in plain sight.